Wednesday, March 28, 2012
Friday, March 16, 2012
Supplementary Dates Configuration in SubAccounts
Dates Configuration in SubAccounts
During March While doing day begin in Sub accounts module a message appears. Most of the spms and supervisor firstly just ignore the message. The message is about configuring the Last working day of the March and First working day of April. If you ignore the message while day begin of next day this message also reappears.
The solution for this error isLog in as --->Supervisor--->Go to configurationSelect Supplementary Dates-->
Current Year 2012
Last working day of March 31-03-2012
First Working day of April 02-04-2012
This will solve the error
THANKS TO : SAPARAVUR.BLOGSPOT.COM
Error in subaccounts while doing day beginHere
PROCEDURE FOR ENTERING BOOKED AND DELIVERED INTERNATIONAL ARTILCES IN IPSWEBData of booked EMS articles, International Parcels and International Registered lettersshould be entered in the IPS web client following the procedure given below.1. The web link to be used to access IPS Web Client through public internet is http://ipsweb.ptcmysore.gov.in/ipsweb
Enter given username and password
2. In the identifier field, enter the barcode number of the international article. The barcode canbe scanned or manually entered. Press enter to move to the next field.
3. The date and time fields display the current date and time. The user can select the exactdate and time of booking
.4. In the destination field, use the drop-down list to specify the destination country.
5. In the Mail Item Category field, enter the category of mail item.
6. If the parcel is insured, enter the amount for which it is ensured in the Insured Value field.
7. Click the Sender Details link to enter information regarding sender.
8. Click the Recipient Details link to enter particulars of recipient.
9. Use the Customs Details link to record information for Customs. Select the appropriatecheck box for Merchandise or Gift. Enter the item’s estimated value and the currency.
10. Click the store button.
Procedure to Enter Data of Attemted Delivery of International Articles
1. The web link to be used to access IPS Web Client through public internet is http://ipsweb.ptcmysore.gov.in/ipswebEnter given username and password
2. If an attempt was made to deliver the article and the article could not be delivered, theinformation is to be entered in the ‘Record Unsuccessful delivery (EMH)’.
3. In the identifier field, enter the barcode number of the international article. The barcode canbe scanned or manually entered. Press enter to move to the next field.
4. The date and time fields display the current date and time. The user can select the exactdate and time of attempted delivery.
5. In the non delivery reason field, select the reason for unsuccessful delivery using the drop-down list.
6. In the non delivery measure field, use the drop-down list to specify the measure
7. Click add button. The item is now displayed in the list box in the lower part of the window.
8. Repeat the procedure to enter additional items.
9. When you have finished adding items, click the store button
Procedure to Enter Data of Delivered International Articles
1. The web link to be used to access IPS Web Client is The web link to be used to access IPSWeb Client through public internet is http://ipsweb.ptcmysore.gov.in/ipsweb
2. Enter given username and password
3. When the International Article is delivered successfully, the delivery details are enteredin ‘Record Final Delivery (EMI)’
4. In the identifier field, enter the barcode number of the international article. The barcode canbe scanned or manually entered. Press enter to move to the next field.
5. The date and time fields display the current date and time. The user can select the exactdate and time of attempted delivery.
6. In the signatory field, type the name of the person or the organisation to whom the articlewas delivered.
7. In the location field, type the location where the item was delivered
.8. Click add button. The item is now displayed in the list box in the lower part of the window.
9. Repeat the procedure to enter additional items.
10. When you have finished adding items, click the store button.
Procedure to Track International Articles
1. The International Article can be tracked at the following web page using the barcodenumber.http://ipsweb.ptcmysore.gov.in/ipsweb
Enter given username and password
Select Item track & trace option from Track & trace menu
Select identifier (International and local) button then click in the box provided againstCriteria filter. Remove % sign then enter the barcode number of the international article.
Click search button. It will display latest status of international article.
OR
The International Article can be tracked at the following web page using the barcodenumber.http://ipsweb.ptcmysore.gov.in/ipswebtracking
OR
The India Post website (www.indiapost.gov.in) has a link to track the international article.
Customers who book international articles may be informed of this facility.
Please note following points while working on IPSWEB.
Select appropriate tab of mail category i.e. Parcel, Letter and EMS.In normal circumstances, If articles barcode starts with E series, delivery details is to be entered in EMS mail category,In normal circumstances, If articles barcode starts with C series, delivery details is to be entered in Parcel mail category,In normal circumstances, If articles barcode starts with R series, delivery details is to be entered in Letter mail category,When you click store button after adding all the delivery particulars of items, please note that Message of "( n' Number ) items Successfully Store" (e.g. "04 Items Successfully Store") should be displayed on screen. If this message is not displayed on screen that means a error is happened may be due to broken internet connect etc therefore you have to entered the delivery details again. if above messages is displayed without number of items store (e.g. "Items Successfully Store") , that is also a error, please entered the delivery details again.Posted byPrasanthatWednesday, March 07, 2012Email ThisBlogThis!Share to TwitterShare to FacebookLabels:IPSWEB
Thanks to : SYSADMINDOP.BLOGSPOT.COM
Enter given username and password
2. In the identifier field, enter the barcode number of the international article. The barcode canbe scanned or manually entered. Press enter to move to the next field.
3. The date and time fields display the current date and time. The user can select the exactdate and time of booking
.4. In the destination field, use the drop-down list to specify the destination country.
5. In the Mail Item Category field, enter the category of mail item.
6. If the parcel is insured, enter the amount for which it is ensured in the Insured Value field.
7. Click the Sender Details link to enter information regarding sender.
8. Click the Recipient Details link to enter particulars of recipient.
9. Use the Customs Details link to record information for Customs. Select the appropriatecheck box for Merchandise or Gift. Enter the item’s estimated value and the currency.
10. Click the store button.
Procedure to Enter Data of Attemted Delivery of International Articles
1. The web link to be used to access IPS Web Client through public internet is http://ipsweb.ptcmysore.gov.in/ipswebEnter given username and password
2. If an attempt was made to deliver the article and the article could not be delivered, theinformation is to be entered in the ‘Record Unsuccessful delivery (EMH)’.
3. In the identifier field, enter the barcode number of the international article. The barcode canbe scanned or manually entered. Press enter to move to the next field.
4. The date and time fields display the current date and time. The user can select the exactdate and time of attempted delivery.
5. In the non delivery reason field, select the reason for unsuccessful delivery using the drop-down list.
6. In the non delivery measure field, use the drop-down list to specify the measure
7. Click add button. The item is now displayed in the list box in the lower part of the window.
8. Repeat the procedure to enter additional items.
9. When you have finished adding items, click the store button
Procedure to Enter Data of Delivered International Articles
1. The web link to be used to access IPS Web Client is The web link to be used to access IPSWeb Client through public internet is http://ipsweb.ptcmysore.gov.in/ipsweb
2. Enter given username and password
3. When the International Article is delivered successfully, the delivery details are enteredin ‘Record Final Delivery (EMI)’
4. In the identifier field, enter the barcode number of the international article. The barcode canbe scanned or manually entered. Press enter to move to the next field.
5. The date and time fields display the current date and time. The user can select the exactdate and time of attempted delivery.
6. In the signatory field, type the name of the person or the organisation to whom the articlewas delivered.
7. In the location field, type the location where the item was delivered
.8. Click add button. The item is now displayed in the list box in the lower part of the window.
9. Repeat the procedure to enter additional items.
10. When you have finished adding items, click the store button.
Procedure to Track International Articles
1. The International Article can be tracked at the following web page using the barcodenumber.http://ipsweb.ptcmysore.gov.in/ipsweb
Enter given username and password
Select Item track & trace option from Track & trace menu
Select identifier (International and local) button then click in the box provided againstCriteria filter. Remove % sign then enter the barcode number of the international article.
Click search button. It will display latest status of international article.
OR
The International Article can be tracked at the following web page using the barcodenumber.http://ipsweb.ptcmysore.gov.in/ipswebtracking
OR
The India Post website (www.indiapost.gov.in) has a link to track the international article.
Customers who book international articles may be informed of this facility.
Please note following points while working on IPSWEB.
Select appropriate tab of mail category i.e. Parcel, Letter and EMS.In normal circumstances, If articles barcode starts with E series, delivery details is to be entered in EMS mail category,In normal circumstances, If articles barcode starts with C series, delivery details is to be entered in Parcel mail category,In normal circumstances, If articles barcode starts with R series, delivery details is to be entered in Letter mail category,When you click store button after adding all the delivery particulars of items, please note that Message of "( n' Number ) items Successfully Store" (e.g. "04 Items Successfully Store") should be displayed on screen. If this message is not displayed on screen that means a error is happened may be due to broken internet connect etc therefore you have to entered the delivery details again. if above messages is displayed without number of items store (e.g. "Items Successfully Store") , that is also a error, please entered the delivery details again.Posted byPrasanthatWednesday, March 07, 2012Email ThisBlogThis!Share to TwitterShare to FacebookLabels:IPSWEB
Thanks to : SYSADMINDOP.BLOGSPOT.COM
Saturday, March 10, 2012
POSTAL ABBREVIATIONS
Thursday, March 08, 2012 Admin No comments
56 APO - 1st CBPO
99 APO - 2nd CBPO
APO - Army Post Office
APPU - Asian Pacific Postal Union
AMPC - Automatic Mail Processing Centre
CBPO - Centrally Based Post office
CPMG - Chief Postmaster General
CO - Circle Office
CSD - Circle Stamps Depot
CRC - Computerized Registration Centre
ECS - Electronic Clearance Service
EFT - Electronic Fund Transfer
eMO - electronic Money Order
ePOST - electronic Post
ESMO - Electronic Satellite Money Order
eVPP - electronic Value Payable Parcel
EMS - Express Mail Service
EPP - Express Parcel Post
FPO - Field Post Office
GPO - General Post Office
HPO - Head Post Office
ISP -India Security Press (Nasik)
IVP -Indira Vikas Patra
ILC - Inland Letter Card
IMO - Instant Money Order
IFSMO - International Financial System Money Order
IMT - International Money Transfer
KVP - Kisan Vikas Patra
MSY - Mahila Samridhi Yojana
MO - Money Order
MDG - Mukhya Dak Ghar
NSC - National Savings Certificate
PRSS - Pay Roll Savings Scheme
PIN - Postal Index Number
PLI - Postal Life Insurance
PSD - Postal Stores Depot
PTC - Postal Training Centre
PMG - Postmaster General
PCO - Public Call Office
PPF - Public Provident Fund
RMS - Railway Mail Service
RO - Regional Office
RL - Registered Letter
RLO - Returned Letter Office
RPLI - Rural Postal Life Insurance
SBCO - Savings Bank Control Organisation
SPA - Speed Post Article
SRO - Sub Record Office/ Sub Record Officer
TMO - Telegraphic Money Order
UPU - Universal Postal Union
VPL - Value Payable Letter
VPP - Value Payable Parcel
V-SAT - Very-Small Aperture Terminal
Thanks to : http://manooss.blogspot.in
Friday, March 9, 2012
Regarding removing of OUT OF ACCOUNT CASH
Dear system administrator,
Out of Account entries will be displayed if submit account is not done
properly in a particular module like, Postman, POS, SBCash etc., on a
particular day. Check whether these amounts are properly incorporated in
the PO accounts.
If the amounts are properly adjusted in PO Accounts, Send fax message from
your divisional office confirming the same and for providing a solution to
delete the entries. Send backup of Treasury database also for the purpose.
There is no standard solution for deletion of the entries. The entries are
to be verified individually from the database.
-
With Regards
Help Desk
Center for Excellence in Postal Technology
Postal Training Center Campus
Mysore 570010
Karnataka , India
Ph: +918212449015
Fax: +918212440526
Add a User to Windows Server 2003
Add a User to Windows Server 2003
The procedure for adding a new user to Windows depends on the Microsoft Windows version.
In addition, there are several ways to add new users to most Windows versions. The instructions presented here show only a few of the possible paths to creating new users on Windows.
In Windows Server 2003, users can add either local user accounts or Active Directory accounts.
Add a Local User to Windows Server 2003
Click the Start button
Click the Control Panel menu item
If in the Classic View, click Switch to Category View
Double click the Performance and Maintenance icon
Click the Administrative Tools icon
Click the Computer Management icon
In the left window pane, click the + sign beside Local Users and Groups to expand that menu item
Again in the left window pane, click Users
Right click once in the right window pane to bring up a menu
Click the New User menu option
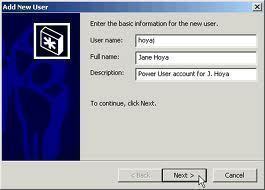
Enter the User name for the new account
Enter the Full name for the new account
Enter a Description for the new account
Enter a Password the new account
Re-enter the same password to confirm
Choose the appropriate options for the new account:
User must change password at next login (Recommended)
User cannot change password
Password next expires
Account is disabled
Click the Create button
Click the Close button
Add an Active Directory User to Windows Server 2003
Click the Start button
Click the Control Panel menu item
If in the Classic View, click Switch to Category View
Double click the Performance and Maintenance icon
Click the Administrative Tools icon
Click the Active Directory Users and Computers icon
In the left window pane, click Users
Right click once in the right window pane to bring up a menu
Click the New menu option
Click the User menu option
Enter the First name for the new account
Enter the Initials for the new account
Enter the Last name for the new account
Edit the Full name for the new account (if necessary)
Enter a User logon name for the new account
Enter the domain for the new account or select it from the drop down list
Enter a password for the new account
Re-enter the same password to confirm
Choose the appropriate options for the new account:
User must change password at next login (Recommended)
User cannot change password
Password next expires
Account is disabled
Click the Next button
Click the Finish button How to Add a User to Windows
Add a User to Windows XP
Click the Start button
Click the Control Panel menu item
Double-click the User Accounts icon
Click the Create a new account menu item
Type a name for the new account in the data entry box
Click the Next button
Choose to create either a Computer administrator account or a Limited account
Click the Create account button
How to book HSC/SSC parcel under head BNPL
How to book HSC/SSC parcel under head BNPL
Check that data received from the school is in the following format
Data File Structure for Customer Data:
--------------------------------------------------------------------
Column A. Serial No
Column B. Name,
Column C. Add1,
Column D. Add2,
Column E. Add3,
Column F. City,
Column G. Pincode,
Column H. Barcode,
Column I. Reference Number
--------------------------------------------------------------------
Note:
1.First row should contain only Column names not actual Data
2.Excel File - Sheet name should be Sheet1 Only. It shouldn't
be renamed with any other names.
----------------------------------------------------------------------
The field size in the data file should be as follows:
---------------------------------------------------------------------------
Field Type MaxLength
---------------------------------------------------------------------------
Addressee name (name) Char 30
Addressee address(addr1) Char 30
Addressee destination(city) Char 15
Pin code Numeric 6
Article number Char 13
Customer Reference Number Char 30
----------------------------------------------------------------------------
Note: The data should conform to the above specifications.
If not, upload not possible.
----------------------------------------------------------------------------
Compulsory Fields in the File are:
Serial Number,Name,Add1,Pincode,Barcode,Reference Number
----------------------------------------------------------------------------
Please ensure that articles are arranged in same order as they appear in the list
In Speed net under head BNPL take following steps
BNPL > upload excel data file > continue > (select) Maharashtra board > click on (...) > open the excel file where the above mentioned data stored > upload data> click OK > (if pin codes are not correct make necessary changes and save) click on next > select article type – EXPRESS PARCEL > fetch data > (on right side enter article no i. e. bar code > in weight column enter weight > click on calculate tariff (do the same procedure for all articles and check down whether weight enter was correct or not ) > after entering all weight on left side enter total weight as 0 > click book > (if any pin code is wrong enter correct pin code by selecting it and with the help of PIN CODE WISE option and save one by one) click on finish button in pin code screen > click book > message received that articles booked.
After booking all articles go to ISSUE in speed net > CLOSING OF EPP BAGS and close the bags as we does normally
After closing of bag dispatch all the bags by entering there label nos as we does normally.
After you finished dispatching of bag go to – TOOLS on speed net> FLUSH DATA > select SELECTED PERIOD and FLUSH DATA NOW > click OK > message will appear data flushed successfully
For checking the bill for BNPL customer go to report > BNPL > customer report> daily detailed> select all necessary options and report will appear.
Thanks to: Kurla PO
Subscribe to:
Comments (Atom)